Ok, ok I will admit....I am a Twilight fan and definitely Team Edward! With the recent release of the Twilight: Breaking Dawn Part 1 DVD as my inspiration, I decided to host a birthday party for one of my Besties. At first, I couldn't decide if I wanted to decorate like the Bella and Edward's wedding or if I wanted to do a black, white, red chess theme. Guess which one I chose?? You guessed it, the chess theme, was totally inspired by the cover of the fourth book.
One of the first things I had to do was come up with a menu. I tried to incorporate all of the guest of honor's favorite foods, from eggplant to Brie, to carrot cake and lemons. I found some great recipes online and created an awesome menu! All the recipes were really easy and so delicious. Here's what we dined on that night:
*
Butternut Squash, Ricotta, and Sage Crostini
*
Honey-Tomato Bruschetta with Ricotta
*
Eggplant-Feta Phyllo Pies
*
Mushroom Goat Cheese Phyllo Bites
*
Honey Walnut & Brie Tartlettes
*
Polenta Cups with Braised Beef
*
Chicken Satay Skewers
* White Cheddar & Rosemary Popcorn
*
Lemon Meringue Pies
*
Carrot Cake Cupcakes
(All the recipes are linked up to the website I found the recipe)
 |
| The Menu |
 |
| Butternut Squash, Ricotta, & Sage Crostini |
 |
| Roasted Tomato & Ricotta Bruchetta |
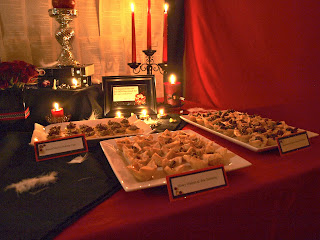 |
| Brie, Walnut, and Honey Tartlets |
 |
| Mini Lemon Meringue Pies |
 |
| Carrot Cake Cupcakes topped with Chocolate Chess Piece |
I also came up with some awesome cocktails and mocktails for the special evening. Here's what we sipped on:
*
Edward Elixir
* Jacob's Werewolf Brew (Edward's Eye)
* Bella Berry Spritzer (Sparkling Cranberry Apple Cider, Non-alcoholic)

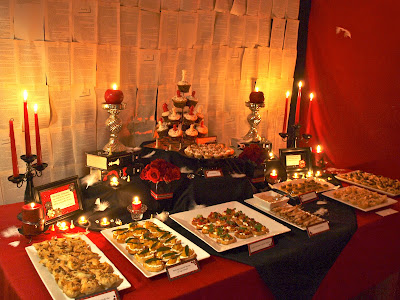
As far as the decorations go....I first had to set the mood. I hung up red Christmas lights from the ceiling, then draped some black create paper criss-crossing each other to form a chess board on the ceiling. I also tied some fishing line to some white feathers and hung them throughout the holes of the "checkered board" ceiling. So as to look like they feathers were floating. (If you have seen BD Part 1....then you know the scene I was going for!) And of course, tons of red candles everywhere! I hallowed out a little hole at the top of some red apples and set in a red tea light candle. I set out black candelabras and even busted out the crystal candle holders (you know, because Edward sparkles) fitted with long red taper candles I filled three wide vases with red crystals in the bottom, filled with water, and placed a floating red rose candle. I also took four red pillar candles and glued some checkered black and white ribbon around them to tie in the chess board theme. Tea lights and votives were set out on the table, buffet, and counter. Like I said, red candles everywhere!
The backdrop behind the table, is a black sheet with individual pages from a book pinned to it. I also hung up a red table cloth to hide the computer and a black table cloth above the bar to divide the space from the kitchen. It made the room feel so intimate, which was nice.
For the tablescape, I draped a red table cloth on the table then overlaid a black one for some contrast color. I wanted to make the table interesting, so I put some boxes underneath the black table cloth to make some staggering heights for placing food and decorations. The center box, I placed a chess board under the cupcake rack. The two boxes on the sides of the cupcakes I stacked up the Twilight books then a shiny silver candle holder topped with the hallowed apples with candles. Below I placed another smaller box with a black cake platter for the pies. In front of the boxes I laid out the white platters with the yummy food with little handmade food place cards. I also printed out four quotes from the movie, put them on some pretty scrapbook paper accompanied with with some pretty flowers and gems, then framed them. Put two on the table, one on the mantel, and one on the buffet. Throughout the table, I put some extra white feathers, more red candles, some plastic crystals, and some white chess pieces. The table turned out A-MAZ-ING!


I also decorated the mantel and the buffet. I thought simplicity was the way to go for the fireplace since the table is so busy. Just the crystal candle holders with red taper candles, two apples with tea lights, and one of the framed quotes. As for the buffet, I hung up a BD Part 1 poster that came with the DVD up above. A few tea lights and another framed quote plus the party favors and birthday gifts completed the decorations. For the party favors, I burned the soundtrack to Breaking Dawn Part 1 attached a Twilight Woods Bath & Body Works lotion, then tied it all up with a red ribbon and put a Twilight pin in the middle of the bow. Everyone got to take home a little Twilight with them.


Overall, I was very happy how everything turned out. The food and cocktails were awesome, the guests were dressed to impress in their Twilight: Breaking Dawn inspired outfits, everyone loved playing the Twilight Scene It game (winners of course won The Golden Onion), watching BD Part 1 with friends with a box full of fresh popcorn is always a blast, and best of all the Birthday Girl was overwhelmed and so surprised! This was a very fun party to host, I look forward to the next month where I will be co-hosting a baby shower for another dear friend. Be on the lookout for those pictures to come!